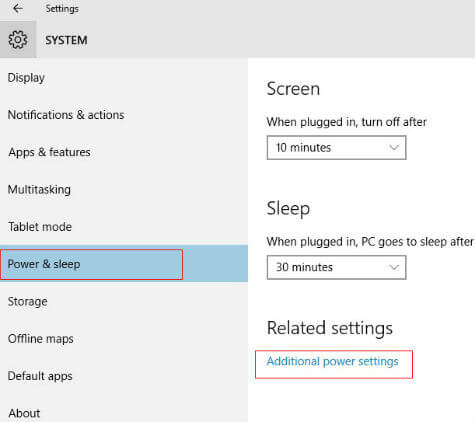
In Windows 10, Microsoft gives many customization options so that we can bring back the hibernate option into the Start menu “Power” options easily. Hibernation of your PC freezes your Apps and Windows and saves the entire data into the hard disk so that when it returns it can continue the pending works from wherever it is stopped. It is very useful for the users so that we can suspend our PC or Laptop for any duration with our device is OFF and when we are ready, we can get back the point where we stopped. If you are using a SSD for your Windows 10 OS, it is better to turn off hibernate function to save SSD life. For more details, visit Dos and Don’ts of SSD to Maximize Performance and Increase Life. We can open “Settings” from your Start button to start with. Now we can see the next generation control panel designed for touch devices which offers much more functions than Windows 8.1. Further we need to move to “System” and then “Power & Sleep” option to start with.
Under Power & Sleep option you can see the time to sleep and shutdown your computer in unattended mode. You can change the “time to sleep” and “time to shutdown” from this window. Below that you will find the link for “Additional power Setting” which we need to open for enabling or disabling the hibernation mode for our Windows 10 device.
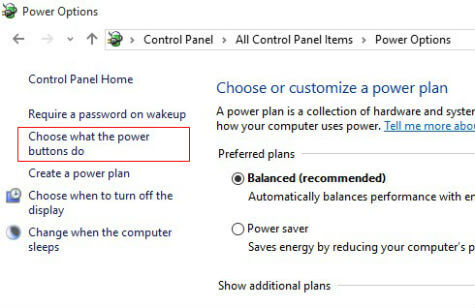
“Additional power settings” link will land you in the familiar traditional control panel window for “Power Options”. Here we can change power options for the computer as like in the old windows versions. Here we need to go to “Choose what Power buttons do” options from the left panel. It will open the system settings window with few options at location “Control Panel\All Control Panel Items\Power Options\System Settings”.
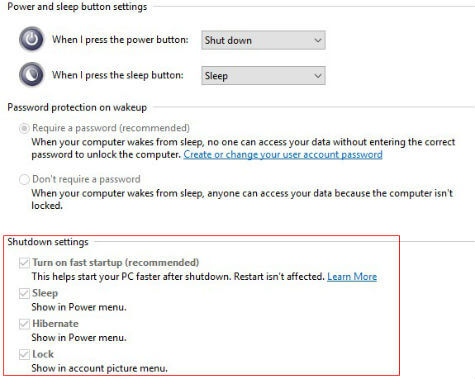
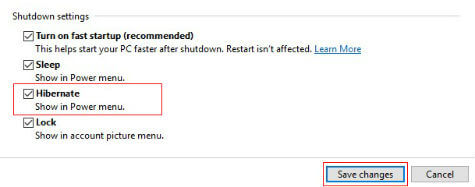
In this system settings screen, we can see that the normal shutdown and sleep options are active and few other options are deactivated under the head “Shutdown settings”. In these disabled settings, we can find out the Hibernate option which we need to enable to change that.
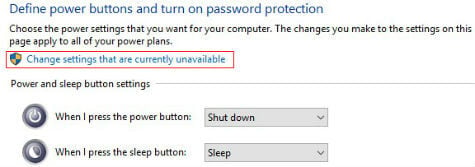
To enable this settings we need to click on a link named as “Change Settings that are currently available” as shown in picture. After you click on that setting, all the disabled options will get enabled including the hibernate option.
Now the setting is very simple that we need to check the box near to “Hibernate – show in power menu”. Now click on save changes button and after saving you can close all these windows.
The Hibernate option will now be displayed in the Power options in the Windows 10 Start button. You can disable the Hibernate option any time by unchecking the setting by above procedure. Hibernation feature in Windows is an old feature available from the beginning versions of Windows. Hence many people will be using the hibernate feature for long time and now we can see that in Windows 10 too which will be helpful to those users.
Δ


